Sunday, 4 February 2018

Pentax W1502N Parts and Functions Explanation


Names of the parts in Pentax W-1502 N


Keyboard


W-1500N series is equipped with two color touch screens and alphanumeric keypad,
operation by both touching screen and pressing keyboard is possible.
Do not touch the screen with ball-pen, pencil or other sharp thing to avoid damage on instrument.


Keys


Name

Functions


0~9/ A~!


Alphanumeric keypad


Enter text and numerical values.

α

Shift key for character entry


Star key

Normal configurations can be set here

Tab


Tab key

Move the cursor right or next position

BS


BackSpace key

Move the cursor left and delete one character

Ctrl


Ctrl key

Same with the Ctrl key of PC

Space


Space key

Enter the space

Enter


Enter key

Confirm an entry or selection

ESC


Escape key

Quit a screen or edit mode without saving changes. Return next higher level


FUNC


Function key

Perform variable functions defined by program screen


◄▲▼►


Navigation key

Control the focus bar within the screen and the entry bar within a field


 🔴


Power key


Turn on/off the instrument

Function introduction
Display
After initiating the instrument the screen will go to present “Welcome Interface” which is shown right.
 Main Menu consists of  “FieldGenius”, “INST SetupInstrument Setup” and “AboutRelevant Information” icons.

↡↡↡


INST Setting


Function introduction
Display
Instrument setup function is mainly applied for instrument settings, instrument calibration and generation and management of instrument constant. It is made up of a series of functions such as “compensatory linear correction”, “compensatory zero correction”, “horizontal axis error correction”, “index correction”, “instrument settings”, “distance constant settings”, “communication port settings”, “configuration management”, etc.


     ↡↡↡


About


Function introduction

The “About” function Offers information of manufacturer and software version.


THANKS

Read more


All about Civil engineering site works.

Saturday, 3 February 2018

Pentax W-1502 N Field Genius and Setting


Field Genius


Function introduction:


By pressing FieldGenius icon, you can start up professional surveying and cartography program “PENTAX FieldGenius”. For the operation of FieldGenius, visit FieldGenius corner in TI Asahi 


Display:


Quick Setting Menu:


Function introduction:


By pressing 【★】 key, you can quickly enter into Quick Setting Menu. In this function, you can refer to electronic vial and check battery status. Also settings such as atmospheric values and EDM targets can be changed anytime in middle of work.

Display:

Quick Setting


Shortcut key:

1) The following is the list of shortcut keys available for W-1502N  Series.


Key combination


Description
🔴

Power on/off


Enter into setting mode directly/turn on the electronic bubble

α


Shift among number, smaller letter and capital letter

FUNC+BS


Turn on/off backlight of key panel in face left position

FUNC+TAB


Turn on/off backlight of key panel in face right position

CTRL+ESC


Show Windows start up menu

CTRL+TAB


Start touch screen calibration

FUNC+CTRL


Turn on/off soft keyboards

FUNC+


Turn on/off LCD display in face left position

FUNC+


Turn on/off LCD display in face right position


2) How to change character input method of Alpha-numeric keys:

By pressing α key, character input method of Alphanumeric keys will be changed. The inputting method will be display on the lower right corner.

 ABC                        abs                        123 


Touch screen calibration & Replace and mount battery Pentax W-1502 N


Touch screen calibration

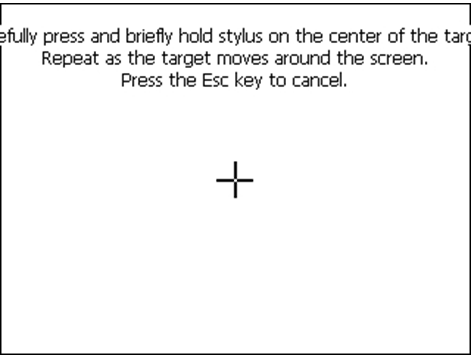
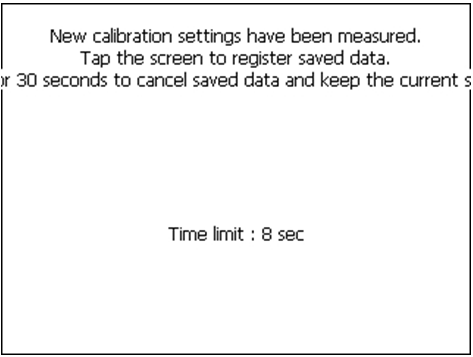
When you operate on the screen, if your device isn’t responding to you taps, you may need to re-calibrate your screen. In any picture, press the combination key “CTRL+TAB” so as to enter into touch screen calibration. The calibration process is shown in the figure below.

1) Carefully press and briefly hold stylus on the center of the target. Repeat as the target moves around the screen. 

2) After all the targets are clicked, the screen will display as left, tap the screen to register saved data. The screen goes back to Stylus Properties menu.

]

                                 Battery                            

Battery Power indicator:


At any screen, presskey to open the Quick Setting Menu.
Select Battery, battery level will be seen following Battery Level.


NOTE:

1. The battery’s working time will be affected by many factors, such as ambient temperature, recharging time, recharging and discharging times. So we suggest the users recharge the battery full or prepare several full batteries before operation.

2. The battery symbol only indicates power capability for current measurement mode. The power consumption in distance measurement mode is more than in angle mode, if the instrument enters into distance measurement mode from angle mode, the power maybe auto-off because of lower battery.

3. The symbol only indicates the supply power but not the instantaneous power change. And if the measurement mode changes, the symbol will not show the power’s decrease or increase immediately.

4. It is suggested that user should check every battery power before field work.


Replace and mount battery:


Two battery are equipped with W-1500 N. Each battery works individually, so it is possible to take off one battery for recharging when the instrument is working.

Removing Battery :

1) As shown in the above figure, push down the flat battery clamp to open the upper battery case.
2) As shown in the above figure, turn the round battery clamp 90°anticlockwise to open the lower battery case.

Mounting the battery:


1) Put battery into battery case with contactor towards inside.
2) Push one battery case towards upper one box into the end, upper battery case will lock automatically

3) Push one battery case towards lower one box into the end,, clockwise turn the round battery clamp 90°to mount the lower battery case.

Recharging battery:


The W-1500 N comes with two lithium-ion rechargeable batteries with a typical operating time between 4.5 to 15 hours.


Specifications

Battery Type:            Li-ion

Voltage:          7.4VDC

Capacity:        2500mAh

[Battery Charger]

AC Adapter

Input: 100-240VAC ~50/60Hz 1.7A

Output:          19.0VDC @ 3.16A


How to recharge Batteries:


1).    Plug the AC cord to AC Adapter.
2).    Plug in AC Adapter to Battery Charger.
3).    Plug the AC wall battery charger into the wall socket and   power LED turns ON.
4).    Place your battery in charger bay correctly.
5).    Wait until battery LED indicator turns GREEN for a full     charge.


LED

Description

NONE

Battery is not seated correctly

GREEN

Battery is fully charged

RED

Battery is being re-charged

Flashing RED

Charge error or bad battery


❗ A fully discharged battery will take approximately 2 hours to fully charge and may not light the LED status indicator when first mounted.
[Battery Installation and Replacement]

    ❗
Removing the battery in use will cause the W-1500N to restart or turn OFF.  Use the battery status indicator in data collection software to confirm which battery is “in use” before hot-swapping batteries.


When remaining battery power becomes small, a warning message to alert battery run-out will start coming up. When the message comes up, be sure to replace the battery to fully charged one.
If the battery runs out in middle of use, the instrument will not automatically save the data.

Press button to open battery door compartment
Use the guide to slide the battery into the W-1500N
Swivel the battery door compartment up and push from the bottom until it latches completely.


What you need to know


Can I remove one of the batteries while the W-1500 N is in use?

Before battery removal, use data collection software to check which battery is in use.  Remove the battery not in use

How long does it take to charge a battery?

It takes 2 hours to fully charge a battery

How do I know if battery is fully charged?

Battery bay LED turns Green when fully charged

❕ <> Contact a Recycling Center to ensure proper disposal of lithium-ion Batteries.

Thanks for Reading


ALL ABOUT CIVIL ENGINEERING SITE WORKS

Thursday, 1 February 2018

USB connection import and export in Pentax W-1502 N


● The file in the instrument could be read through Active Sync software by USB cable.

● External memory stick could be used by USB Host connector. The file in the external memory stick could be read in the instrument interface.

1Open the cover of USB which behind the display panel

2Input external memory stick into USB Host connector


3The external memory stick could be recognized as hard disk automatically. It could be file copy etc.